
A manager sends a draft policy to the team, and two days later someone prints an old version and treats it as final. Or a freelancer shares a proposal and wants the company logo faintly behind every page. A small label in the background would have prevented both problems.
Learning how to add a watermark in Google Docs takes just a few minutes. A watermark is faint text or an image that appears behind the content on every page, such as “DRAFT,” “CONFIDENTIAL,” or a logo. Google Docs is the editor, and the watermark becomes part of the document stored in Google Drive, so it travels with the file when you share or export it.
This guide covers text watermarks, image watermarks, per-page workarounds, removing them, and the limits you should know before you rely on one.
What a Watermark Does and Does Not Do
A watermark is a visual label. It tells readers what status a document has or who it belongs to. It does not control who can open, copy, or change the file.
Use a watermark for:
- Marking drafts, samples, or internal review copies
- Adding a company logo to proposals or reports
- Labeling documents as “Confidential” or “Do not copy”
- Showing that a worksheet or template is not final
Do not rely on a watermark for:
- Security. Anyone with edit access can remove it in seconds.
- Legal protection. A label does not replace permissions, contracts, or access controls.
- Hiding information. Text behind a watermark is still fully readable and copyable.
Sharing settings do the real protective work. Read Google Docs Commenter vs. Editor to understand who can change what, and consider view-only sharing for finished copies.
Pro Tip: Use a watermark as a signal and permissions as a lock. They solve different problems, and you often need both.
Check Your Setup First
The built-in watermark tool has a few requirements.
- Use a computer. The watermark option appears in the desktop web version of Docs. The mobile apps may not let you add or edit one, though they can display it.
- Use a paged document. Watermarks need page layout. In pageless view, switch back to pages through File, then Page setup, and choose the Pages tab. See how to change the view in Google Docs if you need help.
- Check your access. You need Editor access to add a watermark. A Viewer or Commenter cannot.
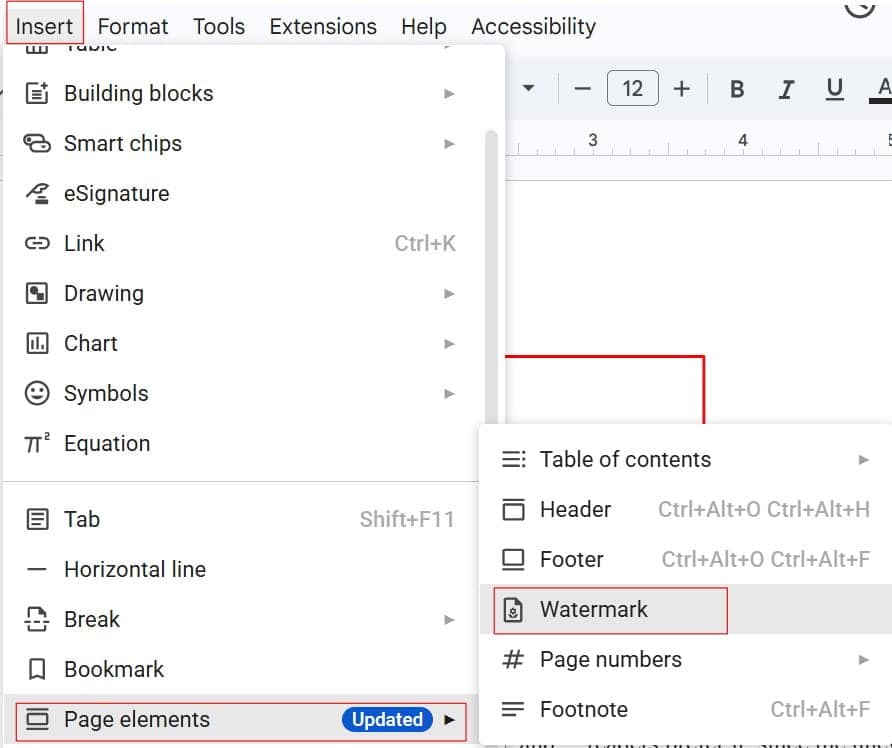
- Know the menu location. The watermark option has been described under Insert, then Watermark, and in some versions under Insert, then Page elements, then Watermark. Labels can vary by account and update, so look in both places.
The built-in watermark applies to the whole document. It repeats on every page. It cannot be set for one page only.
Pro Tip: Finish writing and formatting before you add the watermark. Seeing the page without it makes layout problems easier to spot.
Method 1: Add a Text Watermark
A text watermark is the best choice for status labels.
- Open your document in Google Docs on a computer.
- Select Insert, then Watermark. If you do not see it, try Insert, then Page elements, then Watermark.
- In the sidebar that opens, click the Text tab.
- Type your text, such as
DRAFT,CONFIDENTIAL, orSAMPLE. - Choose a font, size, and color. Use Bold or Italic if you want them.
- Adjust Transparency so the text is visible but does not overpower the document. A mid-range setting, around 50%, is often a good starting point.
- Choose the angle if the option appears. Diagonal text is the classic look, and horizontal text can be easier to read.
- Select Done. See the screenshot below for reference.
The watermark now shows faintly behind the text on every page. Why does transparency matter? A solid dark watermark can make body text hard to read, especially when printed. A very light one can disappear in a copy machine or a PDF viewer. Test your result on screen and in a print preview.
Short words work best. A long phrase becomes small and cluttered. If you need extra detail, place it in the header or the first paragraph instead.
Pro Tip: Use a light gray for the watermark text instead of a bright color. It reads as a background mark and keeps your document looking professional.
Method 2: Add an Image Watermark
An image watermark is useful for a logo, seal, or branded background.
- Prepare a clean image. A PNG with a transparent background works best, because there is no white box around the logo.
- Select Insert, then Watermark.
- Click the Image tab, then Select image.
- Choose where the file comes from, such as upload from your computer, Google Drive, Google Photos, a web address, or the camera on supported devices. The available sources can vary.
- Select the image and click Insert.
- Use the Scale control to resize it. A larger scale makes the image cover more of the page.
- Check Faded to make it semi-transparent. Uncheck it if you want the image fully visible.
- Look for more image options if you want to adjust brightness or contrast.
- Select Done.
The image is centered on each page. Choose a simple, high-contrast graphic. Detailed photos behind text are hard to read. If your logo has extra empty space around it, trim it first. You can learn to crop in how to crop a picture in Google Docs, and if you need an image placed elsewhere, see how to center an image in Google Docs.
Image rights matter. Only use logos and artwork you own or have permission to use. Add alt text to meaningful images if the option appears, so the file remains accessible to screen reader users.
Pro Tip: Check the watermark on the smallest text in your document. If you cannot read it with the logo behind it, lower the contrast or scale the logo down.
Watermark on Only One Page
Because the built-in feature repeats on every page, you need a workaround for a single page, such as a cover page.
Use a drawing text box.
- Go to the page where you want the mark.
- Select Insert, then Drawing, then New.
- Choose the Text box tool, draw a box, and type your text, such as
SAMPLE. - Change the text color to a light gray and increase the size.
- Select Save and close.
- Click the drawing, then choose the layout option Behind text.
- Drag it into position.
- If you want an angle, you can rotate the drawing from inside the Drawing window. For related help, see how to rotate text in Google Docs and how to insert shapes in Google Docs.
This floating object does not move with the text, so finalize the content first. It also does not repeat, so copy and paste it if you want it on a few pages.
Use a page background instead. If you want a color or image across the page, the page setup background options may fit. Read how to set a background image or color in Google Docs for what is available.
Use the header. A logo in the header appears on every page, but it is not behind the text. See how to create a letterhead in Google Docs and how to make the header smaller for layout options.
Pro Tip: For a cover page that needs a different look, put the cover in its own document and combine files at the PDF stage.
Edit or Remove a Watermark
You can change a watermark at any time.
- Select Insert, then Watermark again, or right-click the existing watermark if the option appears.
- In the sidebar, change the text, font, color, size, transparency, or image settings.
- Select Done to apply the changes.
To remove it:
- Open the same watermark sidebar.
- Select Remove watermark. It appears at the bottom of the panel, under the tab you used.
- Confirm that the watermark is gone from every page.
Removing a watermark affects everyone who opens the document, so tell collaborators if you plan to remove a “Confidential” label from a shared file. If you removed it by mistake, press Ctrl+Z (Cmd+Z on Mac) or use File, then Version history, then See version history to restore an earlier version. Restoring replaces current content, so name the present version first. For lost files, see how to recover a file from Google Docs.
If you see a watermark you did not add, check whether the file came from Word or a PDF conversion. The sidebar can only remove watermarks that Docs recognizes. For other marks, you may find a floating image, a header element, or a background layer. Check the header area and any drawings.
Pro Tip: Keep a clean copy without the watermark in a separate folder. When the draft becomes final, you can start from the clean version.
Watermarks, Printing, and Export
Watermarks behave differently depending on how you output the file.
- Print. Use File, then Print and check the preview. Light watermarks may print faintly or not at all on some printers. If printing fails, read why you can’t print from Google Docs.
- PDF. Select File, then Download, then PDF Document (.pdf). The watermark is part of the page and appears in the PDF. Open the file to confirm.
- DOCX. Watermarks generally carry over in Word downloads, but they may shift slightly. See how to save as DOCX and check the result.
- Copying text. A watermark does not stop people from selecting and copying the visible text. A PDF can also be converted back to editable text by other software.
A downloaded copy is separate from the cloud file. Adding or removing a watermark in one does not change the other, so keep track of which version you send.
Pro Tip: Before sending a PDF, scroll through every page. Check that the watermark does not cover tables, signatures, or small print.
Because a watermark often marks sensitive files, think about sharing.
- Select Share and add named people instead of using a public link.
- Choose the lowest role that works: Viewer for reading, Commenter for feedback, and Editor only for trusted co-authors.
- Check the recipient list and General access before you send.
Anyone with the link can expose a confidential document beyond its intended audience, and a “Confidential” watermark will not stop a forwarded link from working. Administrators at school or work may restrict external sharing, so some options may be unavailable. For a locked-down approach, see how to lock Google Docs with a password to understand what is and is not possible.
If many people edit the document, remember that any editor can remove or change the watermark. Use view-only sharing for final copies, or send a PDF.
Pro Tip: Put the date or version in the watermark text, such as
DRAFT v2. It helps people avoid mixing up copies.
Troubleshooting Watermark Problems
Start with simple checks.
- No watermark option. Use a desktop browser, switch to pages layout, and check you have Editor access.
- Watermark is too faint or too strong. Adjust the transparency, color, or the Faded setting.
- Image looks cropped. Change the scale. Very large settings can push part of the image off the page.
- Watermark covers the text. Lower contrast, reduce size, or use a lighter color.
- Watermark missing in print. Check print settings for background graphics, and test another printer or export a PDF.
- Cannot remove it. The mark may be a header image or drawing, not a built-in watermark. Check the header and click floating objects.
- Watermark is on every page, but I need one page. Use the drawing text box workaround.
Frequently Asked Questions
How do I add a watermark in Google Docs?
Open the document on a computer, select Insert, then Watermark, and choose the Text or Image tab. Customize the content and transparency, then select Done. If you do not see the option, check under Insert, then Page elements.
Can I add a watermark to only one page in Google Docs?
Not with the built-in tool, which applies to every page. Use a drawing text box set to Behind text on the page you want.
How do I remove a watermark in Google Docs?
Select Insert, then Watermark, and choose Remove watermark in the sidebar. If it does not appear, the mark may be a header image or a floating drawing.
Can I add a watermark in the Google Docs mobile app?
The mobile apps may not offer the watermark tool, though they can display existing watermarks. Use a computer to add or edit one.
Does a watermark protect my document from copying?
No. It labels the document but does not stop people from reading, copying, or removing it if they have access. Use sharing permissions to control access.
You learned how to add text and image watermarks in Google Docs, adjust their transparency, handle single-page cases, remove them, and check them in print and PDF. A watermark is only a label, so control who can open and edit the file with sharing permissions, and keep a clean copy in case you need one. I hope you found this article helpful.
You May Also Like
- Certificate template in Google Docs
- Google Docs newsletter template
- How to make a flyer in Google Docs
- Google Docs for business
- Google Docs for students

I am Rajkishore, and I have over 14 years of experience in the Software Industry. For a long time, I have been using Google Docs, Google Drive, and Google Sheets for my document usage, and I am sharing all the tips and tricks, the challenges I have come across, and their solutions to use Google Docs for your day-to-day use. I hope you will learn from these practical Google Docs tutorials. Read more.