

Are you wondering how to create lined paper in Google Docs? Though there is no direct approach, you can do it by inserting a table in your Google Docs document.
How to make lined paper in Google Docs
Follow the below steps to create the lined paper in Google Docs
- Navigate to https://docs.google.com/, Click on the Blank (+) button to create a new empty Google Docs document.

2. Click on the Insert menu –> select the Table option –> then choose the 1 X 1 table.
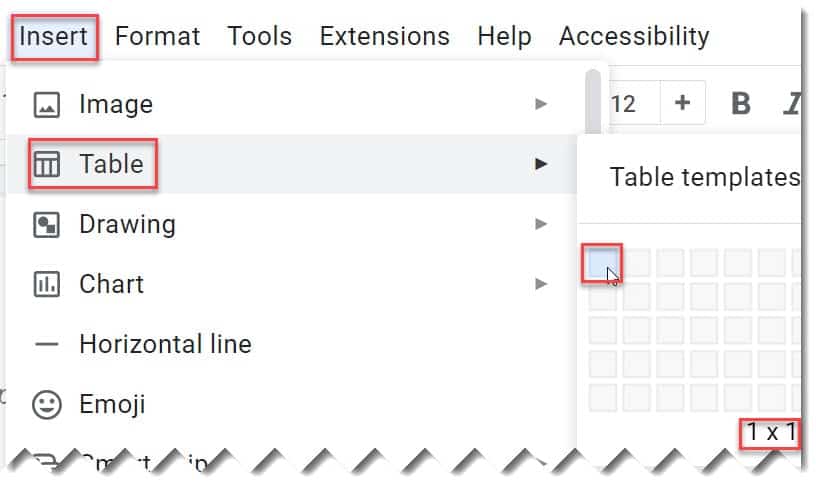
3. Click on the drop-down that you can see if you click on the top right corner inside the table –> Select the “Select Outer border” option as highlighted below.

4. Choose the dark gray 2 option from the Border color dropdown.

5. Select the left and right borders. You can click on the left border, press the Ctrl key, and click on the right border to select both borders at once. Then, click on the Border width option and choose the 0pt option to remove both borders.

6. Right-click inside the table and then choose the + Insert row below option.

7. Repeat the above step (step – 6) until you cover the complete page or as per your requirement. Congratulations! You have successfully made lined paper in Google Docs.

You may also like following the articles below
- How to make a word cloud in Google Docs
- How to make a bracket in Google Docs
- How to make trademark symbol on Google Docs (4 Easy Methods)
- How to make header smaller in Google Docs
- How to make a poster in Google Docs
Voila! Using the above instructions, it is so easy to make lined paper in Google Docs. Thanks for reading this article!

I am Rajkishore, and I have over 14 years of experience in the Software Industry. For a long time, I have been using Google Docs, Google Drive, and Google Sheets for my document usage, and I am sharing all the tips and tricks, the challenges I have come across, and their solutions to use Google Docs for your day-to-day use. I hope you will learn from these practical Google Docs tutorials. Read more.