
You are 30,000 words into a manuscript, and the file is falling apart. Chapter titles use five different fonts, a page break is stuck in the middle of a paragraph, and the page numbers restart for no reason. When a beta reader sends comments on a different copy, you lose track of which draft is current.
A reusable template fixes that before the problems start. When you create a book template in Google Docs, you set the page size, fonts, heading styles, and front matter once, then copy that master for every new book. Google Docs is the editor, and Google Drive stores your files, so you can write on a laptop, review on a phone, and share a single draft with an editor.
This guide covers page setup, styles, front matter, chapters, page numbers, a table of contents, collaboration, and export, plus the limits where a dedicated layout program works better.
Decide What the Book Needs First
Decide the purpose before you format. A novel, a workbook, a short guide, and a family cookbook need different layouts.
Ask these questions:
- Will you print it, publish it as an ebook, or share a PDF?
- What trim size (the finished page size) does your printer or platform require?
- Does it need images, tables, footnotes, or a table of contents?
- Who will review it, and how many people will edit?
Check the submission rules of any print or publishing service you plan to use, because margins, file types, and page counts vary. Common trim sizes include 5 by 8 inches and 6 by 9 inches, but your platform’s specifications come first.
Pro Tip: Write down the trim size, font, and file type you need at the top of a notes file. Changing those later reflows the whole book.
Set Up the Page Size and Margins
- Open a Blank document.
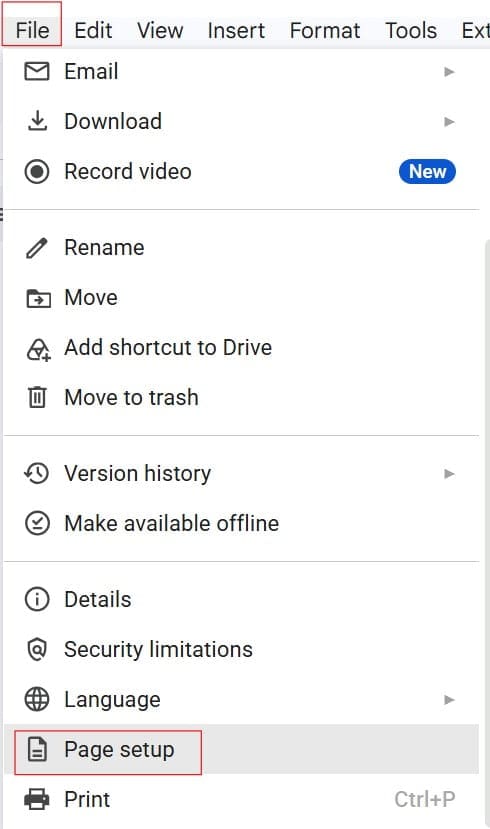
- Select File, then Page setup.
- In the Pages tab, choose your paper size. If your account offers a custom size, enter the trim size, such as 6 by 9 inches. If not, choose the closest listed size and plan to resize in your final production step. See Google Docs page size for options.
- Set margins. A comfortable starting point is 0.75 to 1 inch on all sides. Read how to change margins in Google Docs for step-by-step help.
- Select OK.
Check out the screenshot below for your reference.
Orientation and margins do not apply to pageless documents, so keep your book in paged layout.
Know the limits. Professional print books often use mirrored margins, where the inside margin (near the spine) is larger than the outside margin. Google Docs has no mirror margin setting.
You can choose slightly larger margins on both sides to leave room for binding, or do the final layout in a desktop program. Also, Docs has no bleed or color-profile controls for professional printing.
Pro Tip: Test a 10-page sample with your intended settings, then upload it to your printer or platform’s preview tool before you write the whole book.
Create the Core Styles
Styles are saved formatting rules for types of text, such as chapter titles and body text. Using them is the single biggest time saver in a long manuscript, because changing a style once updates every paragraph that uses it.
- Type a sample paragraph and format it as you like: font, size, line spacing, and alignment. For body text, many books use a serif font at 11 or 12 points with 1.15 to 1.5 line spacing.
- Keep the cursor in that paragraph.
- Open the styles dropdown, usually labeled Normal text.
- Hover over Normal text, then choose Update ‘Normal text’ to match.
- Repeat for the other styles:
- Title for the book title
- Heading 1 for chapter titles
- Heading 2 for sections within a chapter
- Subtitle for part titles or taglines
For paragraph indents, use Format, then Align & indent, then Indentation options, and set a First line special indent of about 0.25 to 0.3 inches. Never indent with the spacebar or Tab key. Manual spaces break when the font changes.
To keep these styles in future documents, open Format, then Paragraph styles, then Options, then Save as my default styles. This changes the default for new documents in your account, so skip it if you share the account with other kinds of work.
Left alignment is easiest to read for most books. If you prefer justified text, check for large gaps between words. If you see them, the fix is in the guide to Google Docs spacing between words.
Pro Tip: Name your styles in a note, such as “Chapter title = Heading 1.” Helpers and editors then know which style to use.
Build the Front Matter
Front matter is everything before Chapter 1. Typical pages include:
- Half-title page (just the title)
- Title page (title, subtitle, author)
- Copyright page
- Dedication
- Table of contents
- Foreword or preface, if any
Use a page break between each, with Insert, then Break, then Page break. To see them clearly, turn on show page breaks. If you need to add a blank page, read how to add a page in Google Docs.
Copyright pages often contain legal text, such as the copyright notice, edition, and ISBN. Use the wording that your publisher, printer, or legal guidance requires, and don’t invent notices. If you plan to publish, check the rules of your distribution platform.
Front matter is often numbered with Roman numerals, but Docs does not offer separate numbering formats for different sections in its standard page number menu. A simple workaround is to leave front matter unnumbered and begin numbering at the first chapter.
Pro Tip: Put the front matter in the template with placeholders like
[Book Title]and[Author Name]. Then you only replace text for each new book.
Set Up Chapters and Sections
Consistent chapter openings make a book look professional.
- Apply Heading 1 to each chapter title.
- Select the heading style, then open Format, then Line & paragraph spacing, and check Add page break before if it appears. This starts each chapter on a new page without inserting manual breaks.
- Add extra space above the title by setting Space before in the same menu, so chapters drop down from the top of the page.
- Use Heading 2 for section titles inside chapters.
If you want numbered chapters, learn numbered headings in Google Docs. If you prefer to type “Chapter 1” yourself, keep a consistent pattern across the book.
Use Insert, then Break, then Section break (next page) if you need a separate section, such as an appendix with different columns or headers. Section break options appear in the Insert menu. Remember that removing a section break can merge the formatting of two sections.
Prevent awkward breaks by checking the paragraph settings for widow and orphan control, which stops a single line from sitting alone at the top or bottom of a page. Read widow and orphan control in Google Docs for details.
Pro Tip: Write a chapter in the template, then apply the heading style. Don’t paste text with outside formatting directly, or it will carry old fonts and spacing.
Add Page Numbers and Headers
- Select Insert, then Page numbers.
- Choose the header or footer position and the style you prefer.
- Open More options if you want to hide the number on the first page. Labels can vary slightly.
- Choose where numbering starts if you need it to begin later. See how to start page numbers on page 2 and how to add page numbers in Google Docs.
For a header with the book title or author name, use Insert, then Headers & footers. Google Docs offers a “different first page” option, which lets the title page stay clean. It does not offer separate odd and even page headers in its standard menus, so you cannot alternate author name and book title the way printed books often do. For that detail, plan on a desktop layout tool.
Pro Tip: Keep headers simple. A small page number at the bottom center is clear, works with any trim size, and avoids layout problems.
Insert a Table of Contents
A table of contents (TOC) lists chapters and links to them. It builds from your heading styles.
- Finish applying Heading 1 and Heading 2 to your chapters.
- Place the cursor on the TOC page.
- Select Insert, then Table of contents, and choose a style, with page numbers or with blue links.
- Update it later by clicking the TOC and selecting the refresh icon.
The TOC does not update on its own, so refresh it after you rename chapters or change page counts. For a walkthrough, see how to add a table of contents in Google Docs. A table of contents with links is especially useful for ebooks. If you plan an ebook, read about converting Google Docs to EPUB.
Footnotes are available under Insert, then Footnote. If you add them by mistake, learn how to remove footnotes in Google Docs.
Pro Tip: Refresh the table of contents as the last step before every export. A stale TOC is one of the most common manuscript errors.
Save the Master and Start New Books
- Replace your manuscript text with placeholders and a few sample paragraphs.
- Name the file
Book-Template-Master. - Store it in a Drive folder such as
Writing / Templates. - For each project, select File, then Make a copy, and rename it, for example
My-Book-Title-Draft1-2026-10.
Never write in the master. If you accidentally overwrite it, open File, then Version history, then See version history, and restore an earlier version. Restoring replaces current content, so name the present version first. For a deleted file, see how to recover a file from Google Docs.
Very long manuscripts can slow down in a browser. If one file becomes sluggish, split it into one document per part, and combine them for the final export. Keep the same styles in each part.
Save a dated copy at each milestone, such as “Draft 1 complete.” Drive keeps version history, but named copies are easier for you and your editor to find.
Pro Tip: Keep one clean “Style sample” page in the master with one example of every style. It shows editors how the book is meant to look.
Unpublished manuscripts are valuable, so share them carefully. Use Share, add named people, and choose the lowest role they need.
| Role | What the person can do | Best use |
|---|---|---|
| Viewer | Read only | Advance readers who only read |
| Commenter | Read and comment | Beta readers and proofreaders |
| Editor | Change the text | Your editor or co-author |
Read Google Docs Commenter vs. Editor and how to make a Google Doc view-only for more. Use Suggesting mode for edits, and use comments for questions. For comment tools, see how to add or hide comments in Google Docs.
Be careful with General access. Anyone with the link can expose a manuscript to people you did not intend, and links can be forwarded.
For unpublished work, share with named email addresses, check the recipient list, and remember that any reader with view access might copy the text. School and organization admins may also limit external sharing.
Pro Tip: Send beta readers a view-only PDF if you only want reactions. Give Commenter access only to people who will mark up the text.
Export, Offline Work, and Compatibility
For writing without internet, set up offline access in advance by following how to make Google Docs available offline. Not every file is available offline automatically.
For export, select File, then Download, and choose a format:
- PDF Document (.pdf) for print proofs and platform uploads
- Microsoft Word (.docx) for editors who use Word; see how to save Google Docs as DOCX
- EPUB Publication (.epub) for a basic ebook, if the option appears in your menu
Open each exported file and check page breaks, fonts, images, and the table of contents. Formatting can shift in other apps. A downloaded copy is separate from the Google Doc, so changes made later will not appear in it. Re-export after each edit and use dated file names.
Google Docs is a good tool for drafting and templates, but it is not a full publishing program. If you need mirrored margins, odd and even headers, bleed, drop caps, or tight typographic control, finish the layout in desktop software.
Book Template Checklist
- Trim size and margins. Match your printer’s specifications and leave room for binding.
- Styles over manual formatting. Use Heading 1, Heading 2, and Normal text for every paragraph.
- Front matter. Include title, copyright, and table of contents pages with placeholders.
- Controlled sharing. Use named people and the lowest role, and avoid public links for drafts.
- Version safety. Save named versions and dated copies at each milestone.
- Export testing. Check PDF, DOCX, or EPUB output before you send it anywhere.
Frequently Asked Questions
Does Google Docs have a book template?
Your template gallery may not include a book layout, and options vary by account. You can build your own with custom page settings, styles, and front matter, then save it as a master and copy it for each project.
What size should a book be in Google Docs?
It depends on where you will print or publish. Common trim sizes include 5 by 8 inches and 6 by 9 inches. Check your printer’s specifications before you set the page size.
How do I make each chapter start on a new page?
Apply Heading 1 to chapter titles, then use Format, then Line & paragraph spacing, and check Add page break before if it appears. You can also insert a manual page break.
Can I publish a book directly from Google Docs?
Not directly. You can export a PDF, DOCX, or EPUB and upload it to a publishing platform, subject to its rules. Check the platform’s formatting requirements first.
How do I keep my manuscript safe?
Share with named people, use Commenter or Viewer access when possible, and keep dated backups. Turn on two-step verification for your Google Account.
You learned how to set the page size, create styles, build front matter, format chapters, add page numbers and a table of contents, and export your manuscript. The best habit is to format with styles instead of manual spacing and to share drafts only with named people at the lowest role they need. I hope you found this article helpful.
You May Also Like
- Journal template in Google Docs
- Character profile template in Google Docs
- Screenplay template in Google Docs
- Magazine template in Google Docs
- Index card template in Google Docs

I am Rajkishore, and I have over 14 years of experience in the Software Industry. For a long time, I have been using Google Docs, Google Drive, and Google Sheets for my document usage, and I am sharing all the tips and tricks, the challenges I have come across, and their solutions to use Google Docs for your day-to-day use. I hope you will learn from these practical Google Docs tutorials. Read more.