
Every time you open a new document, you do the same thing. You select all, change the font from Arial to Times New Roman, set the size to 12, switch to double spacing, and only then start typing. Do that ten times a week and you have wasted a lot of minutes on a setting that should already be right.
You can set default font in Google Docs once, and every new document you create will open with your choice. Google Docs is the editor, and the default style is saved to your Google Account, so it follows you across computers. Files in Google Drive stay as they are, because the setting applies to new documents, not old ones.
This guide shows how to change the default font, size, and spacing, how to update heading styles too, how to reset or change the default later, and why some documents ignore it.
How Default Styles Work
A style in Google Docs is a saved set of formatting rules for a type of text. Normal text is the style for body paragraphs. Headings, titles, and subtitles are separate styles. Each style has its own font, size, color, and spacing.
The default font of a new document is whatever the Normal text style says. Google’s built-in default has been Arial at 11 points. When you change the Normal text style and save it as your default, new documents start with your version instead.
Three facts help avoid confusion:
- Account-level. The saved default belongs to your Google Account. Use another account, and you see that account’s defaults.
- New documents only. Existing documents keep their own fonts unless you apply your defaults to them.
- Styles, not only fonts. The setting saves all styles together, including headings, so check each one.
Because styles control the whole document, changing the Normal text style is better than changing the font on selected text. Text you format by hand, called direct formatting, overrides the style.
Pro Tip: Think of styles as a recipe. Change the recipe once, and every new document uses it. Change a single sentence by hand, and only that sentence changes.
Step 1: Choose and Apply Your Font to Normal Text
Start with a blank document to set the style.
- Open Google Docs and create a Blank document.
- Type a few lines of sample text, such as “Sample paragraph.” You need text in the body to define the style.
- Select that text.
- Choose your font from the font dropdown in the toolbar. If your font is not listed, select More fonts and add it from the font library. Menu names can vary slightly.
- Set the font size in the size box.
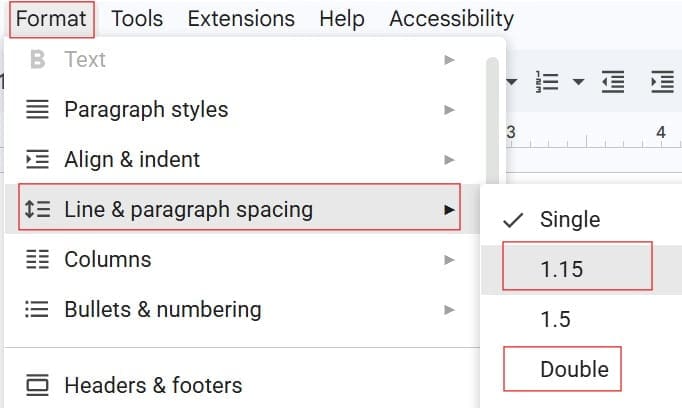
- Set the line spacing under Format, then Line & paragraph spacing. Options such as Single, 1.15, or Double are available. You can also remove or add space before and after paragraphs here.
- Set text color and alignment if you need to. Left alignment is usually best for readability.
See the screenshot below for reference.
Pick a font for a reason. Common choices are Arial or Calibri for modern documents, Georgia or Times New Roman for academic writing, and Roboto or Open Sans for business. Size 11 or 12 works for most body text. Check any style guide or assignment instructions. For example, APA format in Google Docs may require a specific font and double spacing.
If you want to see big text options, read about the biggest font style in Google Docs. If you notice odd gaps between words after formatting, see Google Docs spacing between words.
Pro Tip: Test your font choice by typing a full paragraph, not one line. A font that looks fine in a heading may feel cramped in body text.
Step 2: Update the Normal Text Style
Now teach Docs that this formatting is your new Normal text.
- Keep your cursor inside the formatted sample text.
- Open the styles dropdown in the toolbar. It usually shows Normal text.
- Hover over Normal text. A small arrow appears.
- Select Update ‘Normal text’ to match.
All body text in this document now follows your choice. If the document has other text, it updates to match. This step changes the current document only. It does not yet change your default for new documents.
You can also use Format, then Paragraph styles, then Normal text, then Update ‘Normal text’ to match. Both routes lead to the same result.
Be careful with this step in a shared or existing document. Updating Normal text changes every paragraph that uses that style, which can alter a colleague’s formatting. For that reason, do your setup in a blank document, not in a shared file.
Pro Tip: If body text seems stuck in the old font, check for direct formatting. Select the text and use Format, then Clear formatting, so it follows the style.
Step 3: Update Headings and Other Styles
If you only change Normal text, headings keep their original fonts. Many people want headings to match.
- Type a line and apply Heading 1 from the styles dropdown.
- Change its font, size, and color. For example, use a bold sans-serif font at 16 points.
- With the cursor in that heading, open the styles dropdown, hover over Heading 1, and choose Update ‘Heading 1’ to match.
- Repeat for Heading 2, Heading 3, Title, and Subtitle as needed.
Headings do more than make text look big. They feed the outline panel and the table of contents. See how to add a table of contents in Google Docs and numbered headings in Google Docs for related tools.
Keep the design simple. Two fonts are usually enough: one for headings and one for body text. Make sure each heading level looks different from the next, with a clear size or weight step.
Pro Tip: Set headings last. Once Normal text is stable, you can build heading sizes relative to it, such as 14, 16, and 20 points.
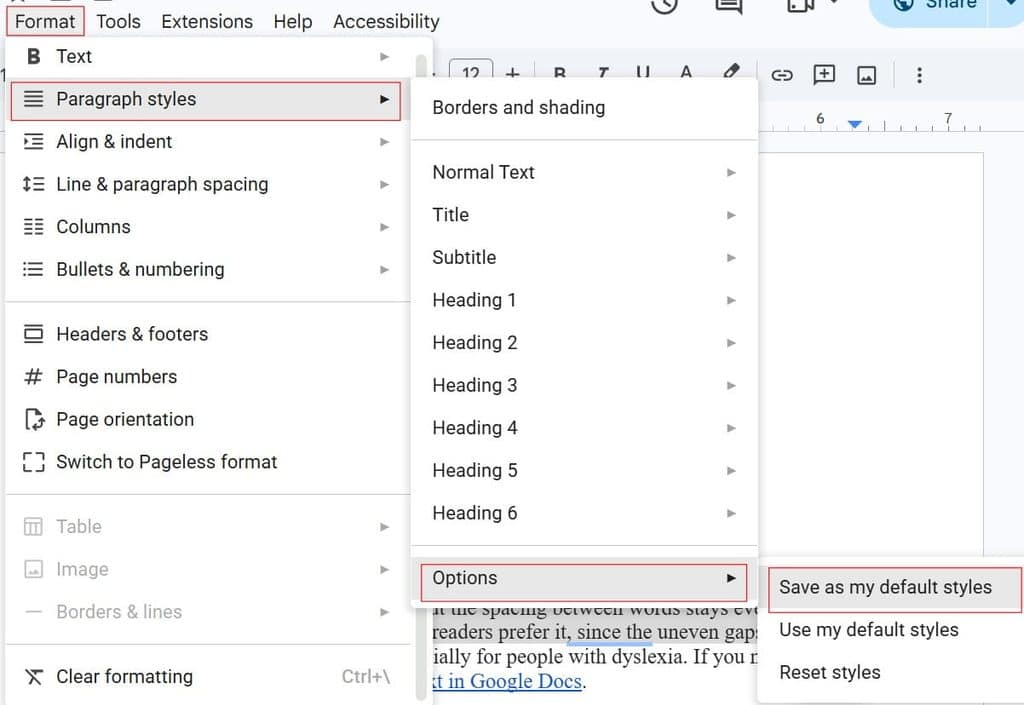
Step 4: Save as Your Default Styles
This is the step that sets your default.
- Select Format.
- Choose Paragraph styles.
- Select Options.
- Click Save as my default styles.
See the screenshot below for reference.
From now on, every new blank document you create with this Google Account will use these styles. There is usually no confirmation message, so test it right away.
Test it:
- Close the current document.
- Create a new Blank document.
- Type a sentence and confirm the font, size, and spacing match.
If the font is correct but the page margins are not, set those separately. Margins and page size are part of Page setup, not paragraph styles. In a blank document, open File, then Page setup, choose your margins, and select Set as default. See how to change margins in Google Docs and Google Docs page size for details. Do this only if you want those margins for every new document.
Pro Tip: Set default margins only if you really use them every time. A one-inch margin is a safe standard, but wide margins can annoy you in short notes.
Apply Your Defaults to an Existing Document
Existing documents do not change on their own. If you want an old file to match your defaults, you have two options.
Option 1: Reset the styles to your saved defaults.
- Open the document you want to change.
- Select Format, then Paragraph styles, then Options.
- Choose Use my default styles.
This applies your saved defaults to the whole document’s styles. It can change many things at once. Text with direct formatting may keep its look. Use it on your own documents, and be careful with shared files, because it affects what every collaborator sees. If unsure, make a copy first with File, then Make a copy.
Option 2: Copy formatting selectively.
- Select text with the formatting you want.
- Use the paint format tool in the toolbar.
- Click or select the target text.
See how to copy formatting in Google Docs for a full walkthrough.
If the result is not what you wanted, press Ctrl+Z (Cmd+Z on Mac), or open File, then Version history, then See version history and restore an earlier version. Restoring replaces current content, so name the present version first. For lost files, read how to recover a file from Google Docs.
Pro Tip: Before you reset an important document, name a version. It takes five seconds and gives you a clean way back.
Reset or Change the Default Later
Your needs change. A class may require a new font, or a new job may use a different standard.
To change the default: Repeat Steps 1 to 4 with the new font, then select Save as my default styles again. This overwrites the earlier default.
To go back to Google’s original defaults:
- Open a blank document.
- Select Format, then Paragraph styles, then Options.
- Choose Reset styles. This returns the document to Google’s built-in styles.
- Select Save as my default styles to make that the new default.
Resetting affects only your account’s default, not other people’s accounts. Each person has their own saved settings.
Pro Tip: Keep a short note of your preferred settings, such as “Georgia 12, 1.15 spacing.” It makes it easy to rebuild your defaults on a new account.
When Your Default Does Not Apply
Several situations ignore your saved default. Knowing them prevents surprise.
- Documents from others. A file someone shares with you keeps its own styles. Your default does not override it.
- Uploaded Word files. DOCX files keep the fonts and styles from Word when you convert them. See how to open DOCX files in Google Docs.
- Templates. A template from the gallery or your organization has its own styles. Changing your default does not alter it.
- Copies. Make a copy duplicates the original’s styles, not your defaults.
- Different accounts. A personal account and a work account have separate saved defaults.
- Pasted text. Text pasted from websites or other documents may bring its own font. Use paste without formatting to apply your style, or paste with formatting when you need to keep the source look. For plain text files, see Google Docs plain text.
- Mobile. The Google Docs mobile app uses the same account defaults for new documents in most cases, but the app lacks the full styles menu. Set your defaults on a computer.
Work and school accounts may also have organization templates or policies, so what you see can depend on administrator settings.
Fonts, Sharing, and Export
Font choices have effects once you share or export a file.
Sharing. Styles are saved inside the document, so everyone who opens it sees the same fonts. Editors can change them. Use Viewer or Commenter roles for people who should not alter formatting. Read Google Docs Commenter vs. Editor for details.
Share with named people, check the recipient list, and avoid Anyone with the link for sensitive documents, since links can be forwarded. Organizations may restrict sharing too.
Export. A PDF embeds the fonts, so the layout is preserved. A DOCX depends on the fonts installed on the reader’s computer. If the font is missing, Word substitutes another one and the layout can shift. Common fonts such as Arial, Times New Roman, and Calibri are safest for Word users. See how to save as DOCX and how to convert a Google Doc to Word without losing formatting.
Accessibility. Choose readable fonts and sizes. Body text around 11 or 12 points is usually comfortable. Avoid decorative fonts for long passages, and keep strong contrast between text and background.
For branded business documents, you can pair your defaults with a header and logo. See how to create a letterhead in Google Docs.
Frequently Asked Questions
How do I set a default font in Google Docs?
Format a sample paragraph, then open the styles dropdown, hover over Normal text, and choose Update ‘Normal text’ to match. Next, select Format, then Paragraph styles, then Options, then Save as my default styles.
Does the default font apply to old documents?
No. It applies to new documents you create. For an existing file, use Format, then Paragraph styles, then Options, then Use my default styles, but make a copy first if the file is important.
Shared documents keep the styles chosen by their creators. Your default applies only to documents you create in your own account.
Can I set the default font on the Google Docs mobile app?
Set your defaults on a computer. The mobile app has limited style tools, but it uses your account’s saved defaults for new documents in most cases.
How do I go back to the original default font?
Open a blank document, select Format, then Paragraph styles, then Options, then Reset styles. Then choose Save as my default styles to make that the new default.
Video Tutorial
You learned how to format Normal text, update heading styles, save your own default styles, apply them to older documents, and reset them later. The key habit is to change styles instead of formatting text by hand, and to name a version before you reset styles in a shared file. I hope you found this article helpful.
You May Also Like
- Google Docs for students
- Google Docs for business
- Memo template in Google Docs
- How to make Google Docs dark mode
- Google Docs vs. Word

I am Rajkishore, and I have over 14 years of experience in the Software Industry. For a long time, I have been using Google Docs, Google Drive, and Google Sheets for my document usage, and I am sharing all the tips and tricks, the challenges I have come across, and their solutions to use Google Docs for your day-to-day use. I hope you will learn from these practical Google Docs tutorials. Read more.